ATO Client Agent Linking: A step by step to guide nominate an agent in online services for business

Hey everyone, I’m Michelle Knight from Little Miss Bookkeeping. In my recent YouTube video, I walk you through the process of nominating a registered tax agent or BAS agent in your online services for business. If you’d like to watch the video tutorial/walkthrough, you can see that here. Otherwise keep reading for the steps we go through in the video. Let’s get started!

Step #1: MyGov ID Setup (Assumed Completed)


First things first, make sure you’ve already set up your MyGov ID. I’m assuming you’ve got that sorted, so let’s move on to the next step in the process.


Step #2: Linking your MyGov ID to your ABN in Relationship Authorisation Manager


You will need to link your MyGov ID to Relationship Authorisation Manager (RAM). Log in with your MyGov ID, undergo the two-factor authentication, and you’re good to go. For demonstration purposes, I’ll use a dummy business name like “Beauty by Bruce Pty Ltd”.


Step #3:
Logging into Online Services for Business


Now, let’s log into the online services for business. Remember, your MyGov ID, RAM, and online services for business are separate set ups however all will need to be set up so you can complete this process.

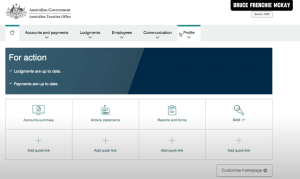
Accessing the Portal > MyGov ID Authentication > Navigate the Dashboard: Once you’ve logged in successfully you’ll be brought to your dashboard. Here you can navigate to Profile > Agent Details. This should bring you to a page where you should see your Tax and BAS agents details, if you have any in there already.


Another important note for Sole Traders and Individuals – you are not required to nominate your Tax or BAS agent. So if you cannot see the “Agent Nominations” section on your screen – that is the explanation as to why.

Step #4: Nominate Your Tax Agent and/or BAS Agent


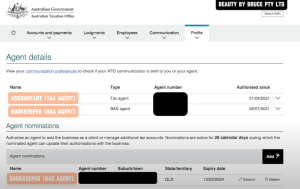
This is where you nominate your agent. Once you’ve found yourself on the agent details and nomination page you can find the “add” button. Locate the agent nomination section within the selected entity. Enter the required details of your chosen agent, whether by name or registration number. Review the entered information for accuracy before submitting the nomination. Once satisfied, confirm the nomination to complete the process.


Remember, each entity does require its own agent nomination, so repeat this process for any additional entities you manage.


Step #5: Inform Your Agent About The Nomination


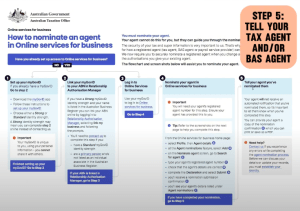
Don’t forget to inform your agent of their nomination – There’s no automatic notification from the ATO to your agent, so shoot them a quick message to keep them in the loop.

Bonus Tip: Troubleshooting – If you encounter any issues, reach out directly to the ATO for assistance. Unfortunately, your accountant or bookkeeper cannot help with this process.

And there you have it – a simplified guide to nominating a registered tax agent. If you have any questions, feel free to ask.


Watch my YouTube video here:

FREE Australian Small Business Income & Expense Tracking Spreadsheet

This video tutorial will get you started to using your Finance Yourself Academy Australia Small Business Income & Expense Tracking Spreadsheet!


📥 DOWNLOAD SPREADSHEET TEMPLATE HERE

https://www.financeyourselfacademy.com.au/download-australian-small-business-income-expense-tracking


Timestamps

0:00 Finance Yourself Academy spreadsheet template

0:58 Who the spreadsheet is suitable for

01:52 Step #1 – Setting up the work paper

02:17 Step #2 – Reviewing & amending your Chart of Accounts

04:19 Step #3 – Reviewing & amending your bank accounts & payment gateways

05:19 Step #4 – Monthly tracking your income & expenses

06:07 Step #5 – Completing the work paper


Watch my YouTube video here:


What happens if I pay my super late?

In this video I wanted to run through what happens if you pay your super late. This is for small business owners in Australia who might be struggling to pay their superannuation on time. Here’s a quick blog on the implications if you pay super late, even if it is by one day. 

As an Australian business owner, if you are unsure of your super obligations and need a little bit more information, the ATO website is the best place to go. Here’s what the page says:


FAQs on paying superannuation 

Common Question #1 – Super due dates: When is my super due?

It’s always 28 days after quarter end.


Common Question #2 – Super clearing house: What is a superannuation clearing house?

As a small business owner, you’ve got to pay your employees superannuation. You don’t just pay them, you’ve got to pay their super fund. But there’s a step in between where you have to pay a clearing house and that clearing house distributes the correct funds to employees’ respective superannuation funds. If you’re using Xero, it has its own built-in clearing house. You can nominate a separate clearing house and the ATO also has a free clearing house you can use.


Common Question #3 – Realities of paying late: What happens when I pay my super late?

1) Annoyed bookkeeper as they will need to process a Superannuation Guarantee Charge form (unnecessary additional work).

2) Annoyed accountant as they help you claim a tax deduction for super. IMPORTANT NOTE: Super paid late is not tax deductible. 

3) You’re annoyed because you pay more tax by not being eligible for the super deduction + more bookkeeping/accounting fees for preparation and lodgement of SGC form.


Common Question #4 – Payment steps: What are the steps when you pay your super late?

An SGC form will have to be prepared for lodgement. It’s made of your outstanding super payable. And the ATO charges a $20 admin fee per employee per quarter. So if you’re constantly late, or you have a lot of employees, that’s gonna hurt. And lastly, they are going to apply an interest charge currently about 10%. So the total payable that you need to pay won’t be just the outstanding super payable, but + admin fees + nominal interest charges.

The ATO wants you to be good business owners. They want you to pay your super on time so that money is utilised and invested in your employee super funds, so it generates income for future employees retirement.


Here’re some quick tips and reminders around superannuation: 


Check out the full video below:

Why you need 3 business bank accounts

In my experience as a business owner, you need a minimum of two bank accounts, three is best and more than three would make you end up doing more bookkeeping admin that’s not really necessary.


Recommended bank accounts:

1) “Everyday” bank account – where your income and expenses would flow

2) “Tax Man” or “Do Not Touch” bank account – designed to cover your GST, PAYGW and superannuation

3) Savings or “Rainy Day” bank account – if you have a little bit of cash surplus, you can put money in here for rainy days or future investments


Entities:

  • Wages/Drawings – transfer funds from the Everyday account to your personal account for your wages or drawings, whether weekly, fortnightly or monthly
  • ATO – from the taxman account, transfer funds to the ATO to pay your lodgements (BAS, IAS, PAYGI, tax returns)
  • Super – if you have any employees or pay super for yourself, transfer funds from the taxman bank account to pay for superannuation


If you are being diligent in keeping track and keeping good habits of taking money from your Everyday account and stockpiling it into your tax man account, when you have to pay your BAS or superannuation every quarter, you can do that on a quarterly basis without having to stress that we do not have any funds to use.


You might be asking – how much to put into these bank accounts?

It all depends, and this is why it’s really important to:

1) have a structure set up

2) get really good clarity on your figures

The best way to do that is to engage your accountant or bookkeeper to set up some automated savings transfers to make sure that you can pay yourself, you can pay the ATO and you can pay the other important obligations.


Watch my YouTube video here:

How to set up your tax invoices for your Australian small business correctly

Things that should be on your invoice:

  1. Name of the document –
    • If you are registered for GST = Tax Invoice
    • If you are not registered for GST = Invoice
  2. Your business name
  3. Your ABN (Australian Business Number)
  4. Purchaser/Buyer name
  5. Invoice Date of Issue
  6. Description of product/service
  7. GST amount details (if the total amount includes or excludes GST)


Tips & Tricks

  1. Include payment options-
    • Direct bank details
    • Links to online payments
  2. Accounting systems will help in keeping track of who still owes you money.


Check out the full video below:


How to TRANSFER your business name with ASIC

How To TRANSFER Your Business Name With ASIC


 You will need to sign up for an ASIC Connect login – https://asicconnect.asic.gov.au/ 


From the homepage, go to the Business Details tab


Select the business name that needs to be transferred. A summary of the company’s details will pop up. 

For this case we will be change the holder details so go to that section, and select CHANGE DETAILS. This will bring you to the Lodgements & Notifications tab. 


Select the business name to be transferred again, and under the Transactions column,
choose Cancel/Transfer Business Name. Hit GO


On the next page, select I would like to transfer this business name. 

Read through the reminders/details on this next page and review the business details.  

Review the declaration and authority boxes, tick the boxes and hit NEXT 


The next page will confirm your request to transfer business name. You will also be sent a confirmation email from ASIC, as well as a Transfer letter which you can forward to the you’re transferring the business to or keep for your records. 

The new holder will be given 4 months to register the business name to securely transfer the registration.

How to REGISTER your business name with ASIC

How to REGISTER A Business Name With ASIC  


You will need to sign up for an ASIC Connect login – https://asicconnect.asic.gov.au/ 


Navigate to the right hand side of the screen and select Register a business name link. 

On the page select Business name registration. 


Review and tick the checkboxes under Things to be aware of. 


On the next page, select the option that applies(e.g business name holder has an ABN and then enter the ABN). Hit NEXT 

Review the ABR details that they they’re correct, and then put in the business name that you want to register.  

Hit CHECK NAME AVAILABILITY.

If it turns up green, that means the name is available. If there was an issue, similar businesses pop up and the page will prompt you to consider having another business name.   


Select the preferred registration period – 1 year registration for $37 or 3 year registration for 6 $88.

We recommend the 3-year registration as it is a value for money and you won’t have to renew business name too soon. 


The next page will ask you to put in your contact details: 

  • Address for service of documents 
  • Principal place of business/practice 
  • Email 
  • SMS (optional) 


Review and eligibility, hit the checkbox and select NEXT
Review the details of the request, and hit SUBMIT 


Read through the declarations to make sure everything is correct and hit NEXT
Pay via credit card or later (where ASIC is going to issue an invoice and you have to pay by the due date listed).
You will then get an email from ASIC to confirm the registration, you may also print the transaction for your records.  

How to RENEW your business name with ASIC

How to RENEW Your Business Name With ASIC


You will expect to receive an email or letter from ASIC that your business name registration is due for renewal to continue using the business name and avoid cancellation.  

Click the PAY NOW link that directs you to the ASIC Connect website. 

Enter your ABN, select the business name that needs to be reviewed.


Choose between the renewal period for 1 year ($37) or 3 years ($88).

Selecting 3 years renewal period is definitely a value for money and would be good if you didn’t want to do the renewal process every year. 


Review your information on the page and hit the declaration and then NEXT 

Pay via credit card or later where an invoice will be issued by ASIC and you have to pay by the due date listed. Hit PAY NOW. 


Print a PDF of your summary for your records.

My favourite 5 small business apps

1. Xero

+ Accounting software
+ Makes bookkeeping a breeze
+ User-friendly
+ Saves time and money


2. Microsoft Office

+ Office Suite (Excel, Word etc.)
+ Integrates with many other apps
+ Lots of functionalities


3. Canva

+ Graphic design
+ Great for novices
+ Makes everything on brand


4. Zoom

+ Video calls
+ Links to your calendar and easy to schedule
+ Works well on both Mac and Windows


5. Dext

+ Bills and receipt tracking
+ Impressive OCR read
+ Integrates with Xero
+ Mobile app is easy to use


Check out my Youtube video below!

My favourite 5 small business apps

How to to apply for your Director Identification Number (DIN)

TRANSCRIPT:

Hi guys, this is how to apply for your Director Identification Number (DIN) online.

So if you watched my first video, I’ve run through what a DIN or a director identification number is. But thought I would run through the process on how to actually do it. We have Dan, who’s going to be our example. As a director of a company you have to do your own. Your accountant/tax agent can’t do it on your behalf. Dan’s going to do it and I’m going to help guide him.  


Step #1 – Set up your MyGovID

I’m on the ABRS website and I’ve navigated to “how to apply for your director ID”.  There essentially are three steps to doing that. The first thing is to set up your my Gov ID. Not to get confused with my Gov as the two are different.  


I know a lot of people have already had this set up on their phone. We literally just set up on Dan’s phone. We used his Medicare card and driver’s license to do that and that took less than 5 minutes. We won’t go through that process in detail but if you go on the ABRS website, you can get instructions on how to do that. 


Step #2 – Gather your documents

You’ll need to gather some basic information. It could be your TFN number, residential address, or two documents to verify your identity. So if you just quickly read these below it could be a bank account, notice of assessment, super details and dividend statement summary or pay as you go payment summary which don’t exist anymore because now we’ve moved to STP finalisation reporting.  


In this case we have Dan’s bank details which the ATO will have for any tax refunds that have gone into his bank account. And I’ve also got a notice of assessment. This is how a notice of assessment looks like. If you’re looking for that you can log into your myGov and you should be able to grab that off there if it’s not readily available to you. 


Step #3 – Complete your application

I’ll go ahead and get Dan to apply now. If we click on here, let’s see what happens. I will put in Dan’s email address, log in to myGovID (go to the app on your phone and authenticate to go to the second step of security).   


So now we’re on the next page. Have a little read through here, just making sure everything makes sense.  


This is obviously your sort of T&Cs. Tick ‘I agree to the T&Cs of use’ and then ‘Next’. The next page will have your name and date of birth and we are going to confirm our identity details. It’s interesting because when I did mine, I didn’t have to go through any of these. I think I might’ve previously submitted some sort of my ID details another way. But we can go ahead and do that. So let’s have a go at the notice of assessment. On the other screen I’m going to put in the date of issue and then the reference ID or reference number.  


And then we have some bank details, let’s go ahead and put those in now.  


And now we have been able to verify Dan’s ID with the identity details and we’ll go ahead and click ‘Continue’. So Dan’s going to read the application requirements and ensure that he complies with everything that’s listed on the screen. Tick the relevant boxes.  


We got personal details that we will review. We’ll go ahead and make sure that that’s all true and correct. We’re just reviewing the details here, making sure we’re in line with the application requirements, making sure that these details are correct and making sure that we complete the application. Click ‘Submit’. 


Step #4 – Record & share your DIN

That’s it! On the very last page you’ll have your director identification number, you will go ahead and save that down.  


And it’ll actually say ‘Next Steps’. Once you save it down, if you’re a client of mine – can you please send me your director ID number so we can save that on the relevant place for you. And if someone else is looking after your corporate secretary affairs, give that to the relevant person. 


If you’re a company director, complete your application form to get your DIN. Any questions, drop us a comment, DM, email and will try to help where we can. Otherwise the ABRS website should be able to have all the information there for you.


I hope this video is helpful and i’ll see you on the next one, bye!